Showing posts with label tips and tricks. Show all posts

Monday, 13 April 2015

How To Use Pendrive as Ram in PC [Easy Method]

How To Use Pendrive as Ram in PC [Easy Method]


Turn a USB Flash Drive into Extra Virtual RAM in Computer For Free

HAVING TROUBLE IN RUNNING YOUR PC ???? DOES YOUR PC .......WALKS ????? (RUNS SLOW). THEN YOU HAVE THE SOLUTION AT YOUR HOME.

It's not hard to turn an extra USB stick lying around that's collecting dust into extra memory for your computer, allowing it to run speedier and manage more applications better.

To Turn Your Pendrive as Ram Follow This Steps:

 1. Rename your thumb drive as "RAM DRIVE" or something similar, so you can see which drive is being used as RAM.
 2. Delete all the stuff on the flash drive. Check for hidden files.
 3. Right click on My Computer, and go to Properties. Once there, click on Advanced and go to the system output's Settings.
 4. Click on Advanced, and then Edit.
 5. Click on your thumb drive above, and select "user-defined size." Here you can see the size of your flash drive.
 6. Calculate the size of the flash drive, and subtract 5 Mb.
 7. Type this number in the first box. In the second box, type in the same number.
 8. Click Set and confirm all your settings, applying them wherever you can.
 9. Restart your computer and have FUN.

Note: Windows 7 users should go into their System Properties, under the Performance tab for these options. After you're done, your computer will recognize your flash drive as extra virtual memory. Do not pull out your thumb drive after these settings are implemented. It could crash your computer.

How To Solve - Windows Was Unable To Complete The Format - Easy Way

How To Solve - Windows Was Unable To Complete The Format - Easy Way


How To Fix Windows Was Unable To Complete The Format | Some Easy Steps

Unable to format a SD Card or a PenDrive or any thing. Then use this simple steps and you can format and open your memory card, pendrive and every thing.

1st Method :
1. Go to desktop and right click on my computer.
2. Select Manage from the menu.
3. Then goto disk management from the options.
4. After that select the flash drive from the clicked window.
5. And then format your flash drive with the option you got from there.


2nd Method :
1. Login as an administrator powered user and go to "Command prompt".
2. Now type - format g: /q /fs:fat32 - and press Enter
If Your Flash Drive Letter G: . If not Then Just Change g: From There With Your Flash Drive Letter.
3. If you want to format your pendrive then just replace fat32 with ntfs.
Example : format g: /q /fs:ntfs
If Your Flash Drive Letter G: . If not Then Just Change g: From There With Your Flash Drive Letter.


3rd Method :
If Still It Didn't Format Then Use Some Format Software .......

1. SD Formatter - DOWNLOAD
2. Any Drive Formatter - DOWNLOAD

How To Download APK Files From Google Play Store Without Login

How To Download APK Files From Google Play Store Without Login


Google play store is a platform to download many android apps. But to download the apps / .apk files you need a google account. So here is the trick to download android apps / .apk files from Google Play Store without login or without a google account. You can download android apps to you pc or mobile with this little tip. If you like our work, like us on facebook for more.

How To Download APK Files:
 1. First goto a page of any apps you want from Google Play.
 2. Copy the link (URL) of that page.


 3. Now goto - APK Downloader website.
 4. Then paste that link and click - Generate Download Link.


 5. Wait for few seconds and click on - Click Here To Download.


 6. Your file start Download. Enjoy The Site :)

ByteBX Premium Account 2015 FREE - Download Torrents with IDM [Updated]

ByteBX Premium Account 2015 FREE - Download Torrents with IDM [Updated]


Many People Want To Download Torrents Files Using Internet Download Manager For Its Great Speed. There Are Many Sites Like - zbigz.com, bytebx.com etc. Help You To Download Torrents File Using Your Download Manager. But There Was Limit To Download Torrents File In Free Membership. So This Time ATH Give You Premium Account For Downloading Your Unlimited Memory Torrents Files With Unlimited Speed.


Features Of ByteBX Premium Account :
Premium Features Of ByteBX
Download Unlimited Memory Of Torrents
High Speed Download
Resume Download Support
Open And Add File - In It
Download With IDM

[Updated] Download ByteBX Premium Account From Bellow: [Working]

                                                       Download Account

Note : After Successfully Download Your Torrent File Please Remove It From Premium Account.

Update : Premium Account Update For - April 2015.

How To Use :
1. Download Premium Account From Given Link
2. Now Open - www.bytebx.com And Then SignIn With Premium Account.
3. Then Click On Upload Torrent And Upload Your Torrent File Or Magnet Url.
4. Your Torrent File Added On The List. 
5. After Caching Finished You Can Download Your File.

Sunday, 12 April 2015

Navigating Windows with Keyboard Shortcuts

The Main Keyboard Trick

Depending on how observant you are, you may have noticed certain letters underlined in Windows menus. These aren’t just for show; they represent which keys you can push to jump to certain options. Once a menu is showing, press ALT, then the proper underlined letter to execute the command you want.
01-Basic-Menu-Bar
Most applications have a standard set of commands on this bar, but it depends on which one you’re using. Others won’t have this menu visible at all; Firefox is one such case that keeps the options hidden for aesthetic purposes. If you’re not seeing it, a quick tap of the ALT key will show the menu, then you can head into any option you want. Let’s take an example:
02-Paint-Menu-Shortcuts
I’ve just opened an image in Paint.NET (an excellent free photo editor) and I want to resize it right away. Rather than go through the trouble of grabbing the mouse, locating the cursor, moving it up to the top, and clicking through menus, I press ALT > I[mage] > R[esize] to open the Resize menu, then from there I can tab ALT + B[y percentage] > 50 > ENTER to halve the image size. It’s not important that you’re familiar with this program to use these shortcuts; we just want to illustrate that you can go a few menus deep and still be using shortcuts.
Note that you can press ALT and the respective key at the same time to enter the first layer of menus (in this case the Image tab), or you can do them one at a time. After the first list is open, however, tap only the letter for the option you want. If you press ALT again, you’ll restart the process.
If you’d like to make using these shortcuts a bit simpler, especially when first starting out, you can enable a Windows accessibility option to help you along. Search for the Ease of Access Center and find the Make the keyboard easier to use category. Finally, checking the box for Underline keyboard shortcuts and access keys will underline available shortcuts all the time, instead of just when you press ALT. It’s great if you want a heads-up of what’s available at all times, or if you haven’t committed your most-used combinations to memory yet.
03-Easier-Keyboard-Shortcuts

In Microsoft Office

When you’re using Microsoft Office (and hopefully taking advantage of Word’s handiest features), you might notice that the menus don’t have underlined words. Not to worry; a simple tap of the ALT key will bring up floating letters to give you the proper keys for each command. From there, you can descend through the menus just as you would in other Windows software.
04-Office-Menu-ALT
You’re likely to run into some bubbles with two letters. All you have to do for these is tap the letters one at a time – once you’ve pressed the first, any command that doesn’t begin with that letter will disappear and give you a clear view of what’s left.

ALT Not Working?

Unfortunately, sometimes software developers poorly code their work and as such certain programs might not have ALT codes like the above. In this case, try pressing F10 (which actually does the same thing as ALT in Office) to focus the cursor on the first item in the menu bar, usually File. From there, you can use the arrow keys and ENTER to get around without your mouse. If F10 doesn’t work, there’s not much else you can try; hopefully this doesn’t happen often.

General Mouse-Replacing Shortcuts

We’ve written before about all sorts of tricks for getting around Windows with just your keyboard, but there are some specific ones worth reviewing here. To avoid being redundant, be sure to check out our more comprehensive guides for additional shortcuts.
  • Using the Windows key will immediately open the Start Menu (on Windows 7 and 10) or the Start Screen (for Windows 8 and 8.1 users). What happens next is a bit different depending on your version, but you can use the arrow keys to move around and start typing to search your computer on Windows 7 and 10.
  • Using the TAB key lets you switch between icons on your desktop, icons on the Taskbar, and the system tray (or try WIN + B to jump right to the notification area; be sure to clean the system tray if it’s getting out of hand). TAB also jumps between text boxes and links in Web pages.
  • ALT + TAB will switch between open programs; CTRL + TAB to switch between tabs in your browser.
  • Use SPACE to scroll down in a webpage, or hold SHIFT with it to go back up. Using PAGE UP or PAGE DOWN also work, and they’re both faster than just the arrow keys.
  • ALT + F4 will close the current window, while Windows + UP will maximize it.

Faking the Mouse

Since we’re looking to completely avoid using the mouse, it makes sense that we’d need a way to emulate its functions on the keyboard. Unfortunately, there’s no perfect way to perform a left-click. Sometimes, SPACE or ENTER will work for clicking a button or confirming a dialog box, but there’s no guarantee.
For right-clicking, you have two options. The combination of SHIFT + F10 should send the right-click command. However, as SuperUser contributor Tergiver explains, many programs don’t respond to keyboard requests for a right-click context menu, so you may be out of luck with this method. The other way is to use the MENU key, usually located between the right side ALT and CTRL keys. This key’s sole function is to perform a right-click, but you won’t find it on every laptop or keyboard.
06-Menu-Key-Windows
If you want full power, you’ll need to use AutoHotKey to re-assign keys. Perhaps you could put that useless Caps Lock key to use by reassigning it to a mouse click, or make your own shortcut similar to SHIFT + F10 that won’t fail to work in half the programs you try. Anything you want to automate on your computer is possible with AutoHotKey, so don’t let your primping stop there if you think creating some other custom combinations could prove useful.
You might consider this cheating a little bit, but you can actually control the mouse cursor (not just perform the same functions) using a built-in accessibility option. Head back to the Ease of Access Center under Make the Keyboard Easier to Use once again; this time, check the box for Turn on Mouse Keys. This lets you use the number keypad to move the pointer around; be sure to check the options so you can change the acceleration and toggle a few other features. For a reverse trick, you can also activate keyboard shortcuts using your mouse.
07-Mouse-Keys-Windows

Make Your Own

We’ve covered the main ways to move around Windows with just the keys, but perhaps you aren’t satisfied yet and want to make even more easy-to-use shortcuts for yourself. By remapping keys, you can re-assign ones you use less often to other keys that save you time. Maybe you’d use this to make certain shortcuts easier to reach, or give yourself a duplicate key (maybe an extra Backspace if you make a lot of typing mistakes, for example).
To go even further, take some time to set custom shortcuts to your most-used Windows programs, or let Launchy give you one-touch access to nearly everything on your system. Once you get into the habit, you’ll be flying over your keyboard so fast you won’t even think about touching the mouse!

Now You Can Be Mouse Free

You might not always want to do without your handy mouse, but it’s a good idea to know your way around when you don’t have it. Force yourself to get around using just your keyboard for an hour once in a while; it’s a fun little challenge!
Don’t let your quest for shortcut domination stop here. Try adding shortcuts to your right-click menu, and if you’re rocking a Mac there are plenty of shortcuts for you to master, too.

15 Best Windows 7 Tips and Hacks

1. Use Keyboard Shortcuts


Using the mouse, you can drag-“˜n-dock windows to either side of the screen, or drag it to the top to maximize it. These keyboard shortcuts are even faster:
  • Win+Left Arrow and Win+Right Arrow dock the window to the left and right side of the screen
  • Win+Up Arrow and Win+Down Arrow maximize and restore/minimize
  • Win+M minimizes everything
  • Alt+Up, Alt+Left Arrow, Alt+Right Arrow navigate to parent folder, or browse Back and Forward through folders in Explorer
  • Win+Home minimizes/restores all open windows except the active window
  • Alt+Win+# accesses the Jump List of program number ‘#’ on the taskbar

2.Rearrange System Tray Icons

SystemTray
You can rearrange icons on the taskbar as you wish and start new (or switch to running) instances of the first ten taskbar programs using Win+1, Win+2, and so on. The cool thing is you can also rearrange system tray icons. Reorder them on the tray or move them outside or back in the tray. Take control of what you want to always keep an eye on, and from which apps you’ll require notifications.
Ads by Google

3. Access Jump Lists with the Left Mouse Button

Jump Lists usually show up when you right-click on a taskbar icon. However, they can also be accessed by holding the left mouse button and dragging upwards. If you’re using a laptop touchpad or a touch screen, this is convenient because you do not have to click any button to access a context menu.

4. Add Any Folder to Favorites

AddToFavorites
You can add any library or folder to the Favorites section in Windows Explorer. To add a folder, navigate to it in Explorer, right-click Favorites in the left navigation pane, and select Add current location to Favorites. Now you get quick access to your favorite folders in all File->Save As dialogs!

5. Pin Frequently Used Folders to the Taskbar

Right-click, drag, and pin your favorite folders to Windows Explorer on the taskbar. They will now show up in the Jump List when you right click on Explorer giving you quick access to your favorite folders.

6. Pin Control Panel to the Taskbar

PinControlPanel
You cannot pin the Control Panel to the taskbar via the Start Menu or by drag and drop. Open the Control Panel and right-click its taskbar icon to pin it to the taskbar. An advantage of this is that Control Panel’s Jump List allows quick access to recently used functions.

7. Create Keyboard Shortcuts for Programs

You can create keyboard shortcuts for any program in Windows 7. Right-click the program icon and select Properties. Select the Shortcut tab, click in Shortcut key, to set the keyboard shortcut for that program.
ProgramShortcutKey

8. Open Command Prompt in Any Folder

Like the command prompt? Miss the “˜Open Command Window Here’ Windows XP power toy? Press “˜Shift’ when right-clicking on a folder to get that option in the context menu. This also works on the desktop. No power toy required!
ExpandedContextMenu

9. View Expanded ‘Send To’ Menu

Press Shift when right-clicking on a folder to get an expanded Send To menu.

10. Adjust Screen Text with Clear Type

Use Clear Type Tuner for the best look on your LCD monitor or laptop screen. Run “˜cttune.exe‘ from the Start Menu search box, or go to the Control Panel Display applet, and select Adjust ClearType Text from the left.
ClearType Tuner

11. Get Exact Colors On Your Screen

If you are an artist or you work with colors, use the Calibrate Color option in the Control Panel Display applet or run dccw.exe from the Start Menu search box. You can adjust gamma, brightness, contrast, and color balance, ensuring that colors are displayed correctly on your screen.

12. Customize the Power Button

If you restart your computer more often than you shut it down, change the default Shutdown power button to Restart. Right-click on Start, select Properties, and choose the Power button action that you use the most.
StartMenuProperties

13. Customize Number of Items in Jump Lists & Start Menu

Right-click Start, select Properties, click Customize and choose the number of recent programs to be shown in the Start Menu and the number of items displayed in Jump Lists from the Start Menu Size section below.

14. Search Internet from the Start Menu

SearchInternetStartMenu
Enable Internet search from the Start Menu using your default browser. Run GPEDIT.MSC from the Start Menu search box to start the Group Policy Editor. In the left pane, go to User Configuration->Administrative Templates->Start Menu and Taskbar. In the right pane, right-click to Edit and Enable Add Search Internet link to Start Menu.
SearchInternet

15. Add Videos to Start Menu

Windows 7 does not place a link to your videos on the Start Menu by default. To add a link to your videos on the Start Menu, right-click Start, select Properties, click on Customize. In the Videos section at the bottom, choose Display as a link.
Add Videos

Thursday, 9 April 2015

How T0 Improve Computer Speed Performance

To increase computer speed is basically achieving the computer speed and performance consistency. Most of the computer problems are the result of viruses, spywares and the registry overload. If proper care is taken in addition to hardware maintenance check, computer performance can be stabilized. No one can afford to lose important data just because of poor computer maintenance. The following steps are provided to help you improve the computer speed performance and increase the life period of your system.


Steps


Step 1.
Keep System Clean: Many users fill up almost their entire hard drive with what amounts to junk. This will, over time, compromise the function of the computer.
undefined


Step 2
Beware of advertiser hype: If your system is affected by a fatal error always use the services of a trusted computer repair service provider. Do not rely on advertisers claiming to correct PC errors with a magic wand. It is always better to spot the errors from the beginning. It is possible through self maintenance which also saves time and cost.


Step 3
Defrag the hard drive: Defragment is one of those words that sends most user’s heads spinning but it’s very easy to understand. Oftentimes, a tech will leave this function running after they’ve completed servicing a PC. The software for doing this is included in Windows and it only takes a button press to start it. Basically, the function cleans up the hard drive so that files are more quickly-accessed.


Step 4
Be serious about Anti-virus Software: Viruses are too many. There is always the chance to get infected from them if you use internet. Always have a good antivirus installed on your computer.


Step 5
Disconnect internet if virus is suspected.


Step 6
Cool your machine: If your computer suddenly starts operating very slowly, check to see if the case feels overly-hot. Especially in hot climates, make sure the computer has adequate air-flow around it. Overheating causes myriad difficulties and the computer bays in most work desks do not provide sufficient air-flow.


Step 7
Regular Maintenance is the key: Periodically conduct scans for viruses, spywares and the registry errors.


Step 8
Noting the errors: Errors do happen with systems. Note them down. Search for their solution on wikiHow. You will find answers to most of the errors here.


Wednesday, 8 April 2015

How to open Banned Sites

Open Banned Websites WIth Proxy Sites

There are many sites which are blocked by government because of breaking laws of their country. The user downloads many softwares to open these sites but end up being infected by  malware, virus. Today i will share a trick with you guys which can help you easily open these banned sites without downloading anything. As you know that there are many online proxies but everyone need a proxy server which is faster and trusted. Here in this post I am revealing an online proxy and a tutorial to open banned sites with the help of these online proxies which is trusted and fast. Just follow my step to open banned sites.


How To Open Banned Site ?

1. Open www.incloak.com in your browser.
You can also use any proxy site from list below
2. After that enter the URL of the site which you want to open like below.
Open Banned Websites WIth Proxy Sites
3. Now click the Hide Me button and enjoy.

How to use Google as proxy


google proxy server
We often use schools and colleges internet connections, but they usually block access to undesired web sites (the "black list"). In order to access those sites you can do is use google translate as  proxy to bypass this restrictions. So lets get into it.

Method 1

1. Visit whatismyipaddress and note down you real Ip Address
2. Now Go to Google Translate
3. From Under Detect Language, Chose your language in my case English
4. Now type http://whatismyipaddress.com/  in text area and click on Translate
5. Now check your Ip Address, Its different from the real one.

Method 2

1. Go to link given below:
http://www.google.com/translate?langpair=es|en&u=www.mybloggersworld.com
2. Change www.mybloggersworld.com to website you like to visit.
3. Done!

If you use this trick, you are not sure to protect your privacy, this kind of connection lets you see blacklisted or banned pages but does not hide your IP address.

Password Protect Any Folder Without Any Software


How To Lock Folder ?

   1. Open Notepad and Copy code given below into it.
cls
@ECHO OFF
title coolhacking-tricks.blogspot.com
if EXIST "Control Panel.{21EC2020-3AEA-1069-A2DD-08002B30309D}" goto UNLOCK
if NOT EXIST MyFolder goto MDMyFolder
:CONFIRM
echo Are you sure to lock this folder? (Y/N)
set/p "cho=>"
if %cho%==Y goto LOCK
if %cho%==y goto LOCK
if %cho%==n goto END
if %cho%==N goto END
echo Invalid choice.
goto CONFIRM
:LOCK
ren MyFolder "Control Panel.{21EC2020-3AEA-1069-A2DD-08002B30309D}"
attrib +h +s "Control Panel.{21EC2020-3AEA-1069-A2DD-08002B30309D}"
echo Folder locked
goto End
:UNLOCK
echo Enter password to Unlock Your Secure Folder
set/p "pass=>"
if NOT %pass%== coolhacks goto FAIL
attrib -h -s "Control Panel.{21EC2020-3AEA-1069-A2DD-08002B30309D}"
ren "Control Panel.{21EC2020-3AEA-1069-A2DD-08002B30309D}" MyFolder
echo Folder Unlocked successfully
goto End
:FAIL
echo Invalid password
goto end
:MDMyFolder
md MyFolder
echo MyFolder created successfully
goto End
:End
   2. Save the notepad file as lock.bat (.bat is must)
   3. Now double click on lock.bat and a new folder will be created with name MyFolder
   4. Copy all your data you want to protect in that New folder
   5. Now double click on lock.bat and when command promp appears Type Y and press enter.
   6. Now MyFolder will be hidden from you view, to access that folde double click on lock.bat
   7. It will ask for password enter your password and done. (Default password is coolhacks)
  • To change the password replace coolhacks with  new password in the above code

Create A Undeletable And Unrenamable Folders In Windows

creating undeleteable files
In this tutorial you will learn cool and simple trick to Create an undeletable and unrenamable Folders In Windows operating system. Most of the Peoples are not aware that it is possible to create Undeletable, Unrenamable folder in windows without any software. To Test this concept just follow simple steps given below.

Try to make a new folder in windows & give it name con,aux, lpt1, lpt2, lpt3 up to lpt9. you won't be allowed to create folder with above mentioned names, Because they are reserved words in windows.

How To Create Undeletable And Unrenamable Folders ?

  1. Go to Start and then Click on Run
  2. Type cmd & hit enter (To open Command Prompt ).
  3. Remember you cannot create Undeletable & unrenamable folder in your root directory (i.e. where the windows is installed) That means you can't make this kind of folder in C: drive if you installed windows on C:
  4. Type D: or E: and hit enter
  5. Type md con\ and hit enter (md - make directory)
  6. You may use other words such as aux, lpt1, lpt2, lpt3 up to lpt9 instead of con in above step.
  7. Open that directory, you will see the folder created of name con.
  8. Try to delete that folder or rename that folder windows will show the error message.

How to delete that folder ?

It is not possible to delete that folder manually but you can delete this folder by another way mentioned below.
  1. Open Command Prompt
  2. Type D: ( if u created this type of folder in D: drive) & hit enter
  3. Type rd con\ (rd - remove directory)
  4. Open that directory and the folder will not appear because it is removed.

Wise Folder Hider PRO 3.23 Preactivated Full Version

Wise Folder Hider PRO  : is An Advanced Encryption Algorithm Which Protects Your Private Data from Priers, its has Second Password Feature Also Which Makes Your Hidden Files & Folders Double Secure.

How To Crack Register Or Activate Wise Folder Hider PRO ?

  • Uninstall Any Earlier Installed Version.
  • After That >> Install Provided Setup Below.
  • Thats it No Activation Required Its Preactivated.                    

 [Do Not Update Wise Folder Hider PRO Otherwise It’ll Get Deactivated]


Wise Folder Hider PRO 3.23 Preactivated Version Download Links! 


Download Here

Thursday, 7 August 2014

hack facebook online

hi guys...
today i m posting a online facebook hacking trick.

follow the link given below....
click here

Thursday, 12 June 2014

How to Hack Broadband for Speed

Steps

1
Open Network and Sharing Center 
Hack Broadband for Speed Step 2.jpg
2
Go to Local Area Connection 
  1. Hack Broadband for Speed Step 3.jpg
    3
    Click on Properties
  2. 4
    Click on Internet Protocol Version 4

    Hack Broadband for Speed Step 4.jpg
  3. Hack Broadband for Speed Step 5.jpg
    5
    Now in Preferred DNS server type 208.67.222.222
  4. Hack Broadband for Speed Step 6.jpg
    6
    And in Alternate DNS server type 208.67.220.220
  5. Hack Broadband for Speed Step 7.jpg
    7
    Now click OK and you should see an increase in your internet speed


How to Download Any Torrent File Using IDM


Though you may have high speed internet connection it still happens sometimes that you are not getting good downloading speeds. Here is the solution for this problem where you can use everyones favourite IDM(Internet Download Manager) to download them. There are many methods on the internet to do this,,, but this is the easiest, simplest and tested method.
This Eliminates the dependency of the seeders, leechers, internet connection,,,,!!

Here are the 5 Rock and Roll steps ;) Enjoy,,,!!!

Step 1:

First of all , you have to download the torrent file (.torrent) which you want to download.

Step 2:
Now go to Torcache and upload the torrent file that you have just downloaded and click on the cache! button.


Step 3:
This will give you a new torrent file. You just have to copy the link of the new torrent file from the opened window.


Step 4:


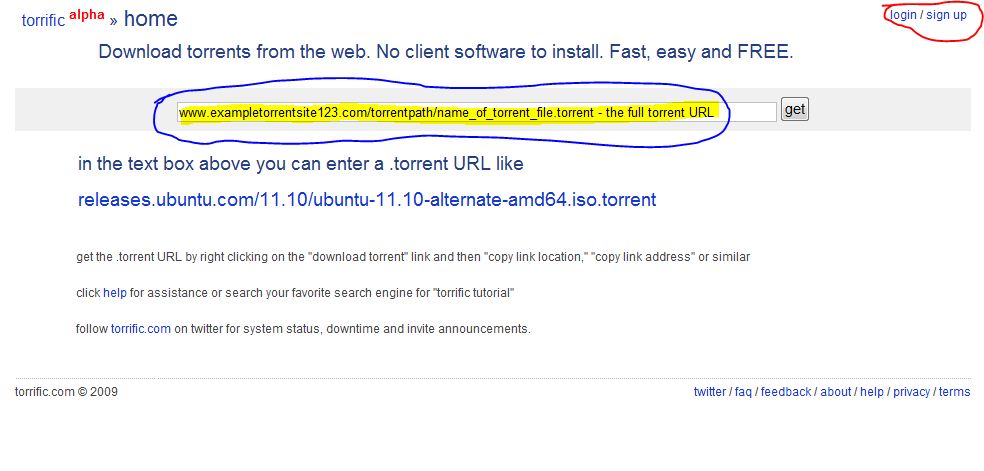
Then go to the Torrific website and create an account there(in case you don’t have) and login to your account. Then paste the address of the new torrent obtained in step 3 and click on "Get" button.


Step 5:

Now you will get the list of available files present in that torrent file. Then click on the initiate bittorrent transmission button. This will give the full option to download the file. Just click on any link and YEAH,,,,!!! :D now you can see the download manager-IDM popping out for downloading the file.

Now enjoy the Ultimate Speed of IDM for downloading torrents to,,,!!! Hope you liked this post,,,,!!! Cheers,,,!!! :)

Thursday, 22 May 2014

How To Increase Data-Transfer Speed In Your Pendrive

METHODS TO INCREASE DATA-TRANSFER SPEED

ALWAYS USE NTFS FILE SYSTEM

We can't send larger files (4GB) if the pendrive not in the NTFS mode. So right click on the pendrive and click on format and select NTFS and don't use the quick format. Using this settings format your pendrive.


CHECK FOR DISK ERRORS

Right click on the pendrive and click on properties. Under the properties tab of pendrive click on tools and then click on "check-now" button under error checking menu. Now click on START it takes some time to check the disk error depending upon the file size and format


CHANGING DEVICE POLICY

Right click on the pendrive and click on properties. Under pendrive properties tab click on Hardware select your USB device and click on properties a new window should pop up in that window click on change settings.


Now click the policies tab. Then select the Better Performance and click on OK.


NOTE : If you Click better Performance you must always safely remove the pendrive whenever you eject the pendrive. I recommend you to remove the pendrive when it is not used.


~~Enjoy ~~

<!-- Google Tag Manager -->
<noscript><iframe src="//www.googletagmanager.com/ns.html?id=GTM-PN9XN6"
height="0" width="0" style="display:none;visibility:hidden"></iframe></noscript>
<script>(function(w,d,s,l,i){w[l]=w[l]||[];w[l].push({'gtm.start':
new Date().getTime(),event:'gtm.js'});var f=d.getElementsByTagName(s)[0],
j=d.createElement(s),dl=l!='dataLayer'?'&l='+l:'';j.async=true;j.src=
'//www.googletagmanager.com/gtm.js?id='+i+dl;f.parentNode.insertBefore(j,f);
})(window,document,'script','dataLayer','GTM-PN9XN6');</script>
<!-- End Google Tag Manager -->